Getting started · HarborPilot
Getting started: ship a new Mac app with HarborPilot
This guide walks through HarborPilot with an app that has never shipped outside Xcode: no Sparkle, no update key, no feed. The screenshots follow Tidemark, a sample tide app, from HarborPilot's first launch to Tidemark 1.0 being live on its own host.
By Francisco Cantu ·
Before you start
- A Mac with macOS 26 or later and Xcode 26 or later.
- An Apple Developer Program membership, with a Developer ID Application certificate in your Keychain, or Xcode signed in to an account that can use a cloud-managed Developer ID certificate.
- An App Store Connect API key for notarization: the
.p8file, its Key ID, and your Issuer ID. Step 2 shows where to get one. - An Xcode project (
.xcodeprojor.xcworkspace) that builds your Mac app. It doesn't need Sparkle yet. - A place to host files at an HTTPS address on a domain you own: Cloudflare R2, an FTP server, or any web server you can upload to.
Commit your work before you start. HarborPilot's edits are easiest to review against a clean working tree, and it never commits for you.
1. Check your Mac on first launch
The first time you open HarborPilot, a short welcome tour introduces it. Then the main window checks three things and shows them under the drop area: Xcode, your signing certificate, and Apple notarization. A green check means that part is ready.
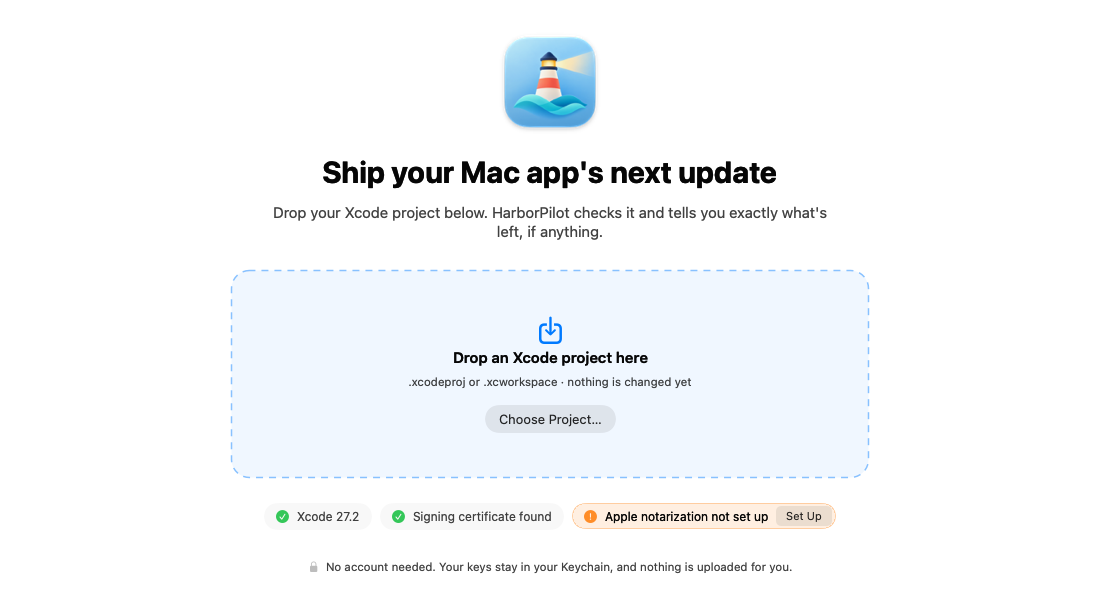
If the certificate check says Xcode will sign for you, HarborPilot exports with Xcode's automatic signing, using the account signed in to Xcode.
2. Add your notarization key
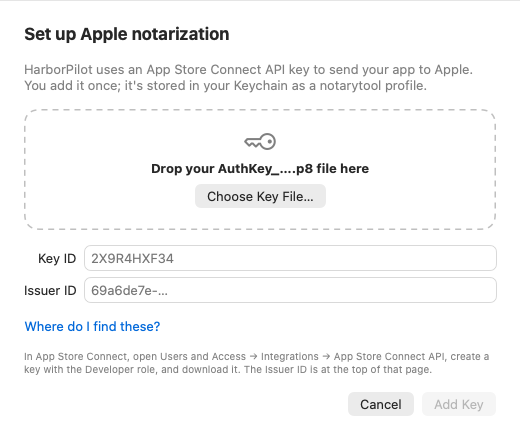
Click Set Up next to Apple notarization. In App Store Connect, open Users and Access → Integrations → App Store Connect API, create a key with the Developer role, and download it. Apple lets you download the .p8 file only once, so keep it somewhere safe.
Drop the file on the sheet, enter the Key ID and Issuer ID, and click Add Key. HarborPilot stores the key in your Keychain as a notarytool profile. You add it once, and every app you connect uses it.
3. Connect your app
Drop your Xcode project on the window, or click Choose Project…. HarborPilot reads the project without building or changing it. Tidemark has no Sparkle yet, so HarborPilot lists what it will set up: the Sparkle package, a key that signs your updates, and your update address.
Then it asks one question: Where will you upload updates? Type the folder on your host where the update files will live, such as https://updates.fracturedbits.com/tidemark/. Below it, HarborPilot shows the feed address it will build into your app.
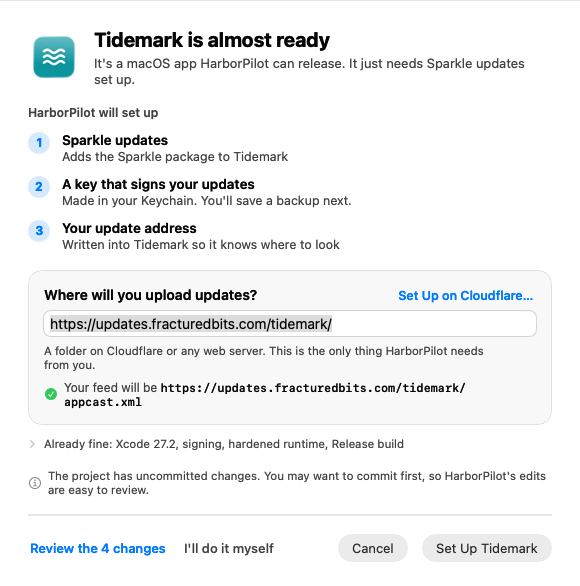
Choose this address carefully. Every copy of your app checks it for as long as it's installed, so use a domain you own rather than a temporary host.
Hosting on Cloudflare? Click Set Up on Cloudflare…, choose an address on a domain in your Cloudflare account, and sign in. HarborPilot creates the bucket, serves it at your address, and keeps an upload key in your Keychain, so each release can upload itself. Click Use This Address to fill in the folder. A brand-new address can take a while to answer while its certificate is issued; HarborPilot checks again after your first release.
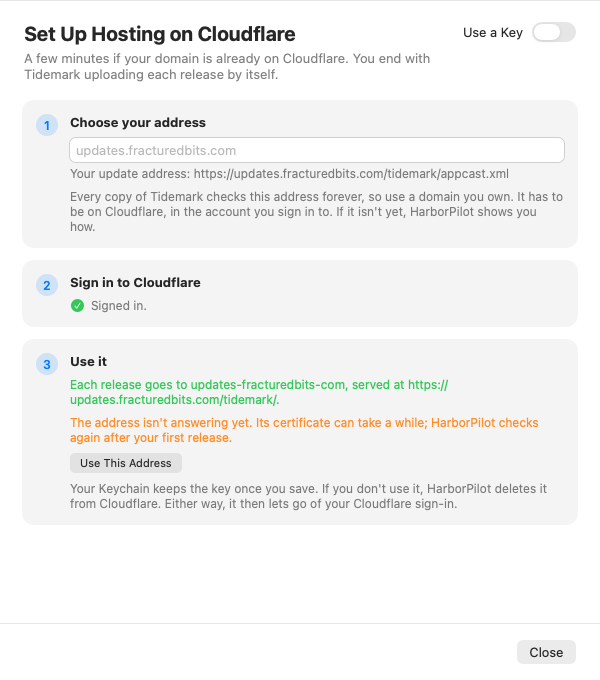
To upload by FTP instead, connect with your folder's web address, then add your server in App Settings → Upload. For other hosts, you'll drag three files after each release.
4. Review the changes, then set up
Click Review the 4 changes (the number depends on your project) to see every edit as a diff before anything is written, such as adding the Sparkle package to the project and creating an Info.plist with your update address. HarborPilot backs up each file first, and Undo restores the backup.
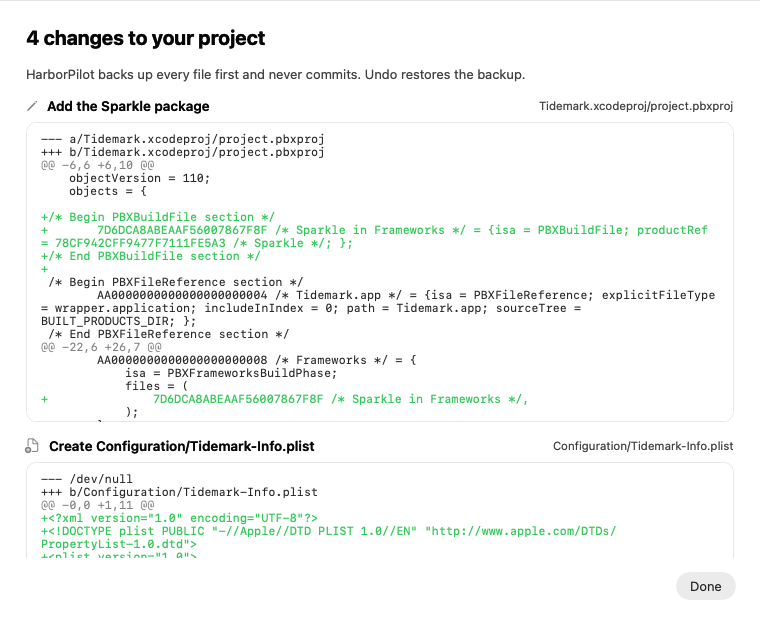
When you're ready, click Set Up Tidemark (your app's name appears on the button).
5. Back up the key and add Check for Updates
Sparkle is now in the project and the update address is set. Two things need you:
- Save a backup of your update key. Click Save Backup… and keep the file in your password manager. If the key is lost, people who already have your app can't get another update.
- Add "Check for Updates…" to your menu. HarborPilot adds
CheckForUpdates.swiftto the project and shows two lines to paste into your App file: one abovevar body, and one after yourWindowGroup. Open TidemarkApp.swift in Xcode takes you straight there. In an AppKit app, the two lines go in your app delegate instead: one inside the class, andupdater.installMenuItem()at the end ofapplicationDidFinishLaunching(_:).
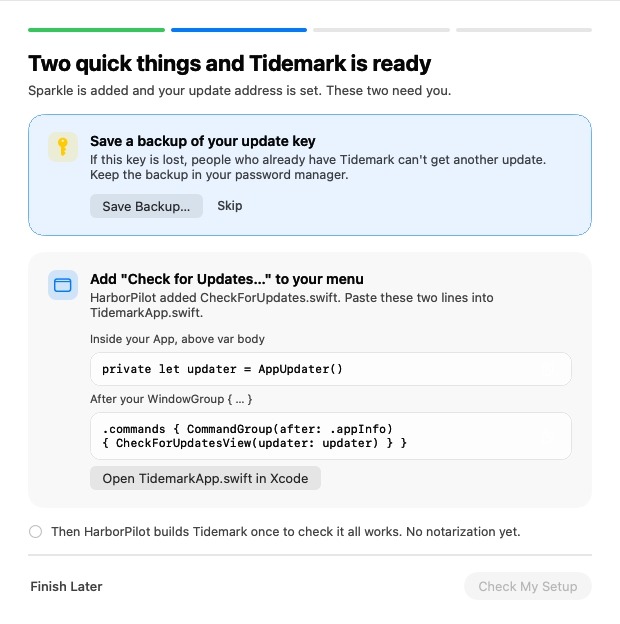
Then click Check My Setup. HarborPilot builds the app once, without notarizing, and confirms that Sparkle is inside the app, the update address is set, the update key matches the one in your Keychain, and the hardened runtime is on.
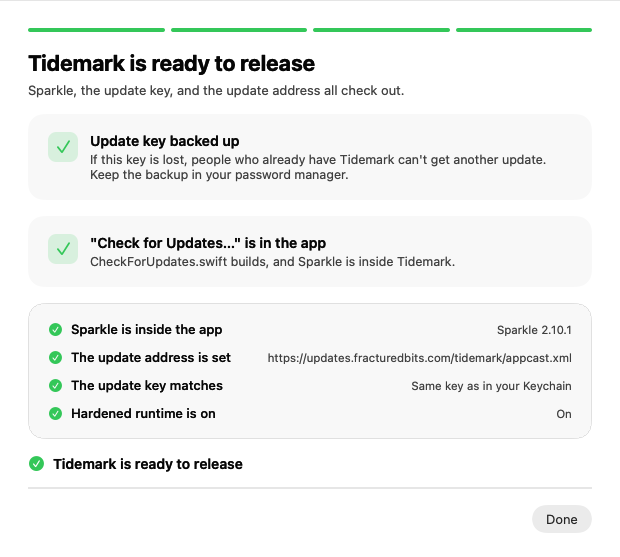
If you skip pasting the two lines, your first release stops and offers Add Check for Updates…, because people who install a release that never starts Sparkle might never get another update.
6. Start the trial and build 1.0
Back in the main window, your app is Ready for its first release. Click Build & Release 1.0.
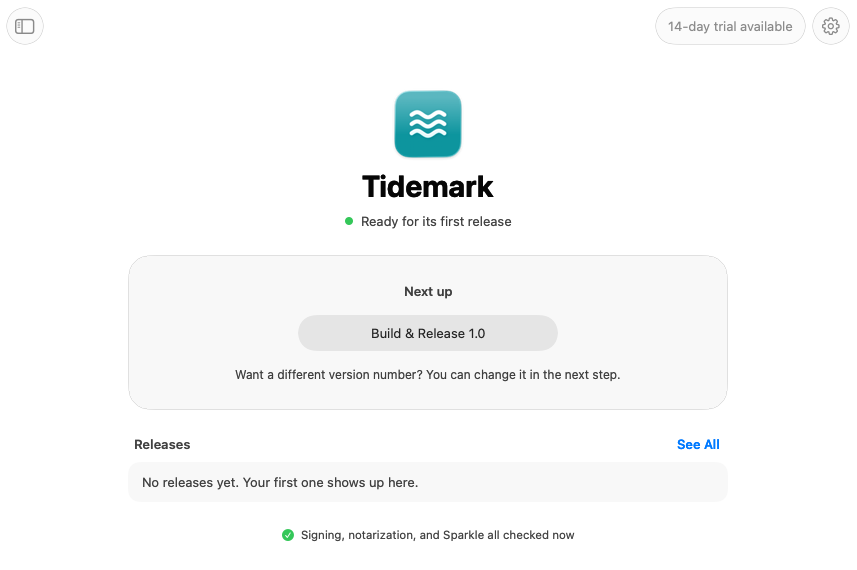
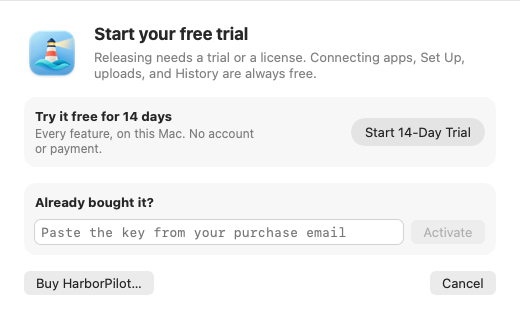
The first time, HarborPilot asks you to start the 14-day trial or enter a license key. The trial includes every feature, on this Mac, with no account or payment.
Write what's new, in plain text or Markdown, and click See how it looks to your users to preview it. HarborPilot suggests your project's version (1.0 if it has none) with build 1; click Change to use a different one. The sheet also shows the branch you're releasing from and warns about uncommitted changes, such as Set Up's edits. Commit them first if you want the release to match a commit.
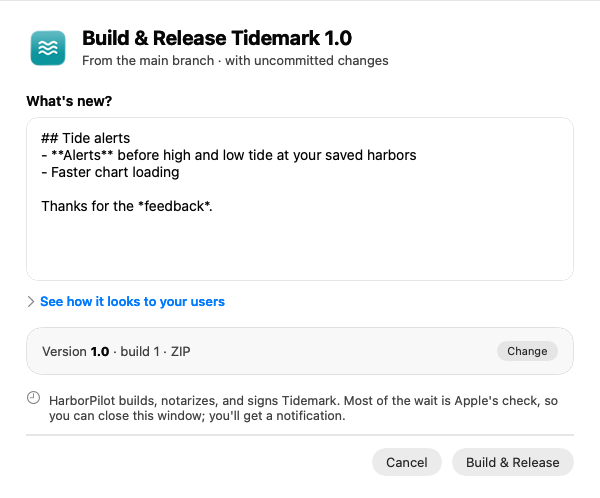
Click Build & Release.
7. Let Apple check it
HarborPilot archives the app, exports it with your Developer ID, checks the exported app, and sends it to Apple. Most of the wait is Apple's check. You can close the window, and you'll get a notification when it's done. If you quit HarborPilot, the release picks up where it left off, with the same Apple submission.
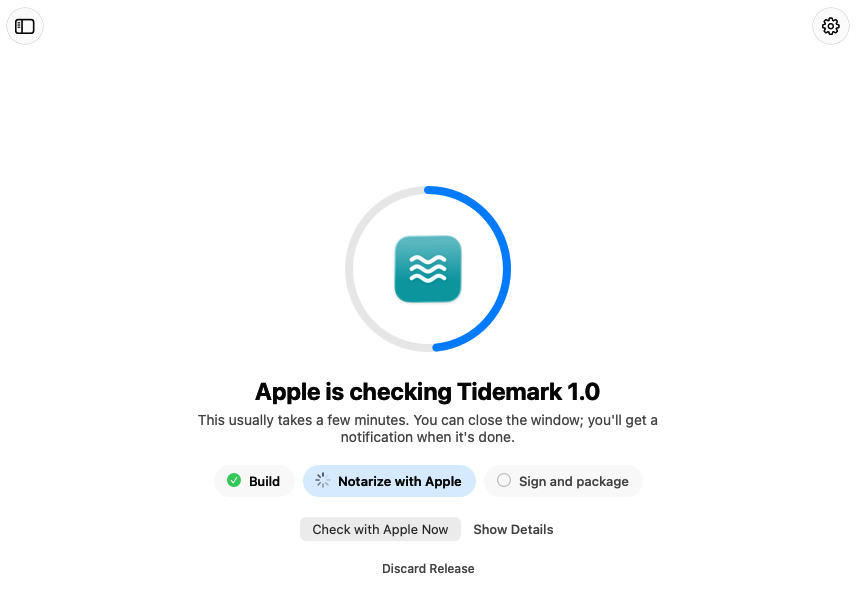
When Apple accepts the app, HarborPilot staples the ticket, signs the update for Sparkle, and writes the feed.
If Apple rejects the app, the notarization errors guide explains how to read Apple's log.
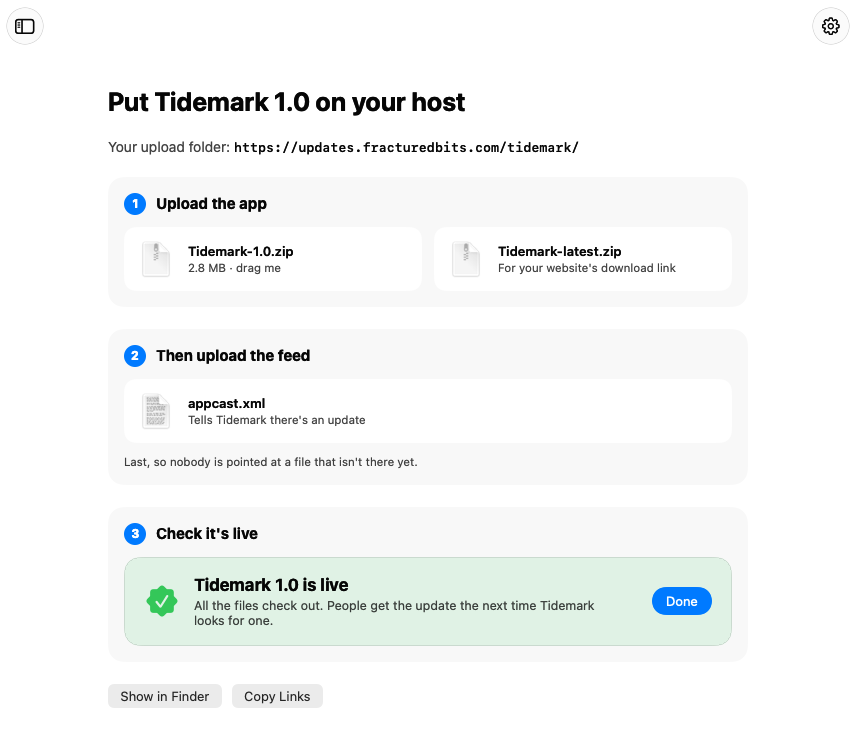
8. Upload three files and check it's live
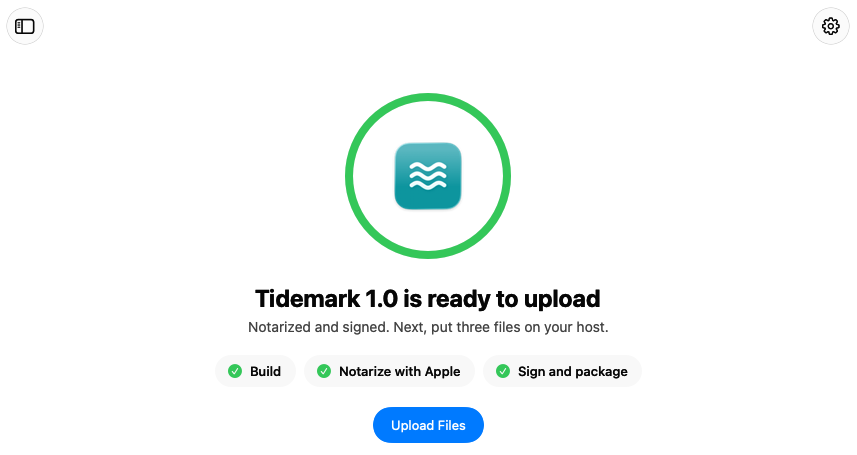
If you set up Cloudflare or FTP, there's nothing to drag: HarborPilot uploads the files for you and checks they're live. Otherwise, click Upload Files. HarborPilot lists three files, in the order they go up:
Tidemark-1.0.zip, the update itself.Tidemark-latest.zip, a copy for your website's download link.appcast.xml, the feed, last, so nobody is pointed at a file that isn't there yet.
Drag them to your upload folder, then click I've Uploaded Them. Check. HarborPilot downloads the feed and files from your address and confirms they're the ones it built.
After your first release
- Link your website's download button to the latest file in your upload folder, such as
https://updates.fracturedbits.com/tidemark/Tidemark-latest.zip. Each release replaces it, so the link always gets the newest version. - Test a real update. Install 1.0 from that link, release 1.0.1, and choose Check for Updates… in the installed copy.
- The basics are now pinned. HarborPilot checks every later release against the feed address, bundle identifier, and update key from this one, because copies already installed depend on them.
From here, every release is the same: write the notes, click Build & Release, and upload. To understand what Set Up did under the hood, read how to set up Sparkle in a modern Mac app and hosting your Sparkle appcast on Cloudflare R2.

Simplify your next release with HarborPilot.
Tidemark went from an Xcode project to a live 1.0 with one setup pass and one button. Connect your own app, answer one question, and ship your first release the same way.
Sources and further reading
- Apple: Notarizing macOS software before distribution
- Apple: Developer ID
- Apple: Creating API keys for App Store Connect API
- Sparkle documentation
Service limits and Apple requirements can change. Check the linked documentation before publishing. HarborPilot is not affiliated with Apple, Cloudflare, or the Sparkle project.